

▲圖片來源:blog.innostation.org
Over the last week, I dived head first into blockchain technologies and spent some time learning more about smart contracts and d-apps by replicating previously-realized projects to help me build my skill set.
But now, time to take it to the next level:
Come up with a project idea and work on it.
And that’s what I did, and I am pretty happy with the outcome I should say.
Either way, in this article, I will share the idea and take you through the process I followed to actually build it out.
The problem
Signing contracts the traditional ways requires trust
So when we sign a contract the traditional way, how do we know that the other party isn’t going to change up the terms on the contract? And how can we guarantee that the other party will not claim they didn’t sign? Do we even want to take that risk?
The answer is pretty clear: NO
Using private keys raises security concerns
But of course, there are already some blockchain solutions that attempt to solve this trust problem, for example using “digital signatures”.
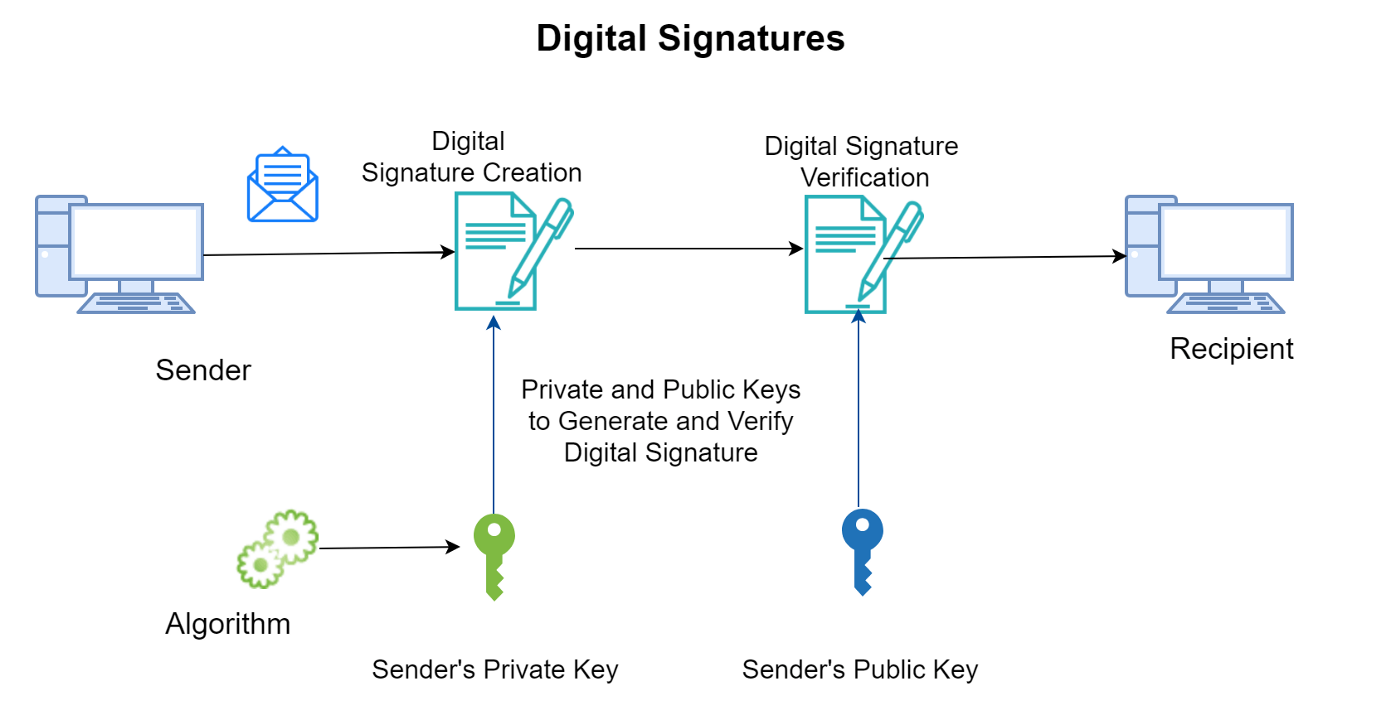
Digital signatures are essentially a way to sign messages on the Blockchain using private keys, and the system has some very cool properties such as being able to use a sender’s public key to verify their signature.
But the problem here is that using your private key is risky security wise, do we want to take that risk? Is there a simpler way to do it?
That’s what I tried to solve for my project.
The Idea
So what is your idea, spill it out!
Okay, I will get to it.
Essentially, my project allows you to “sign” contracts without using any private keys. For a better idea, here is how it works:
- A user goes on the app and “initializes” a contract — writes the contract contents and the recipient’s address.
- The user signs and send the contract to the blockchain.
- The recipient goes on the platform and sees the contract that is meant for them, they are given the option to sign (using their public key) or ignore.
Wait, did I just say sign using a public key?
Yeah.
So essentially, the purpose is to verify that the person signed — agreed to the terms of the contract.
My solution uses a simpler way to do it, without a private key.
And that is when a person initiates a contract, their public address (current account) automatically gets added to the contract…
and the only way their address can be added is if they are connected with their address, meaning that it confirms that the person signed.
And then, a person can only see contracts that were sent to their address.
It’s a pretty simple concept, but it can be used to solve some issues with digital signature.
Applications
The idea can be implemented pretty much anywhere where a contract needs to be signed — employment, rental, deals, …
Limitations
The smart contract doesn’t support multi-line contracts: If you input a multiline contract, the smart contract will just turn it into a single line, definitely a pain in formatting. There are a couple of ways to solve this issue, and I am working on implementing that.
The smart contract doesn’t support more than one contract per user: If a user initiates multiple contracts or needs to sign multiple contracts, only the most recent one will be considered by the smart contract. That is because the smart contract checks contracts by user addresses; however, every contract has its own id, so I should be able to find a contract using an id. I will be working on implementing that change.
The interface is ugly: Not exactly a limitation, however, the current interface is mostly basic html and is not very pleasing to the human eye. The design of it is definitely something I would like to take on over the next few weeks.
Now onto the process to actually build out the project…
Tools:
Metamask:
Whether it’s to write and deploy the smart contract or to test out the front end, you’ll need a wallet on your browser. For this project, we’ll be using Metamask.
Remix:
As a beginner, I prefer working with online IDEs just so I don’t have to install anything locally on my computer. I will be using the Remix IDE to write and deploy the smart contract.
Replit:
Replit is also an online IDE. It does have a beta feature for solidity, but I only use it for the frontend of the application.
Solidity:
I used Solidity to write out the smart contract in Remix.
JS/HTML/CSS:
For the front end, I will be using JavaScript, HTML and CSS. I will also be using some bootstrap for style.
Web3.js:
web3.js is a collection of libraries that allow you to interact with a local or remote Ethereum node using HTTP, IPC or WebSocket.
I will be using web3.js to interact with the smart contract.
Backend:
Step #1: Setting up your workspace
Set up your remix workspace with a solidity file.
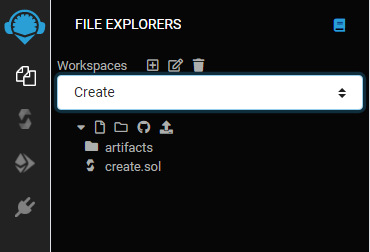
Don’t worry about the artifacts folder, compiling and deploying the contract auto-creates it.
Step #2: Define your license
Define your contract’s license using the SPDX statement. For this project, I used the MIT license.

Step #3: Declare your solidity version
Remember we need to declare the version of solidity that we’ll be using for each smart contract? Right here, I can use version up to 0.9.0.

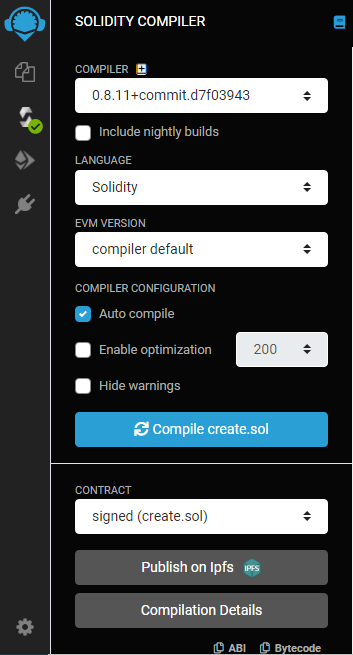
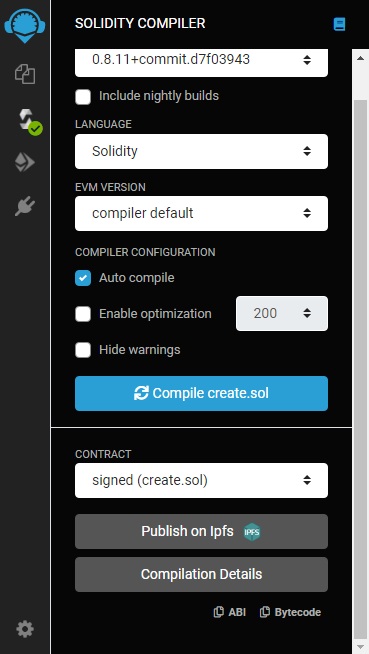
Step #4: Make sure your compiler is properly set up
I would recommend you enable the “auto compile option” to debug in real time. Also make sure your compiler version matches your solidity version and that’s compiling the right contract.
Step #5: Define a contract
Next, define a contract using the “contract” statement. Feel free to name it whatever you want ?

▲Don’t question my naming skills, it’s a bit too complicated.
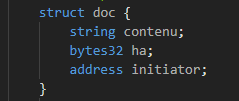
Step #6: Define the structure for a contract
Now we get to the fun part: we start by defining the data structure for a candidate. In my project, I decided that each contract has an id (integer), a content (string), and the initiator’s address (integer).
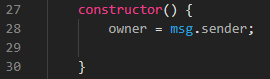
Step #7: Introduce the constructor statement
In this smart contract, there is no interesting action happening in the deployment, so I just defined the owner of the contract to be whoever deploys it.
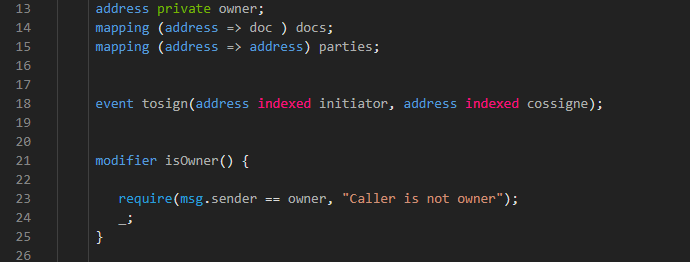
Step #8: Owner’s address visibility, mapping signers and contracts, event and modifier
Before we go into the actual function, I just quickly set up some mapping statements, and event and a modifier to set up my contract.
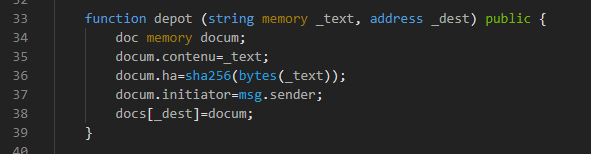
Step #9: Define function to initiate a contract
So now, I can actually define a function to initiate a contract. As an input, it would take in the contract text and the recipient’s address. The initiators address is automatically taken as the person who initiates the transaction.
Step #10: Define function to view a contract
So when an initiator initiates a contract, the recipient wants to be able to see the contract text before signing it (#goodhabits)… So I created a function that does returns the text contract:

Step #11: Define function to sign a contract
Okay so now the recipient view and read the contract and agrees to the term — they want to sign the contract.

Step #12: Define function to check an initiator
This is a function to check if an address initiated a contract. Although I will not be using it in the initial version of the project, I added it in for future releases.

Step #13: Define function to check a recipient:
I also wrote in a function to check if the second person (recipient), signed the contract. I will not be using it in the front end, but I will keep it in either way.

Step #14: Deploy it on the Java Script VM
Golden rule on remix: always start by deploying on the JS VM, just makes life easier.
Step #15: Deploy the application
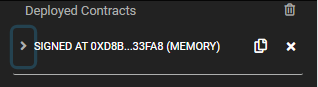
If you tested the application on the Java Script VM and everything was good to go, go ahead and deploy it on a test network — I personally used the Ropsten Test Network for this project — so you can use it on the frontend.
Frontend:
Step #1: Set up a new Repl
Go to your Replit account and create a new repl. Select HTML/CSS/JS for the language as that’s what I will be using.
If you have a template you want to use, or a starter code to get you started, you can clone the GitHub repository directly into repl.
Step #2: Create all the files you would need
I always love to start by creating all the files and structure I know I would need for my project, saves me a lot of frustration later on, here are the files we need:
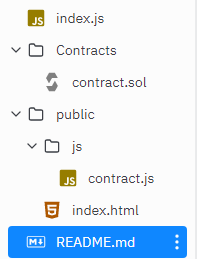
▲I copied the contract right there so I can refer back to it, but it’s not needed at all.
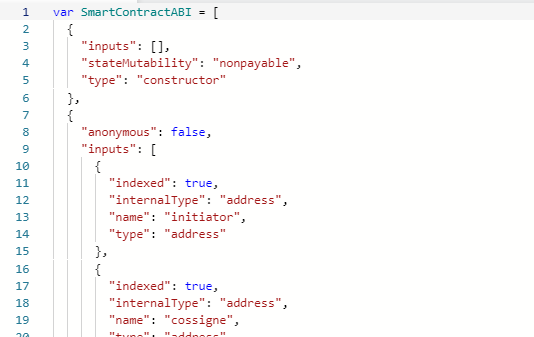
Step #3: Import the ABI
We’re going to start by doing is getting the smart contract ABI from Remix into our contract.js file.
Step #4: Import the contract address
Next, we’re getting our contract address from Remix into our contract.js file.

Now, our contract.js file is ready to go.
Step #5: Set up the index.js file
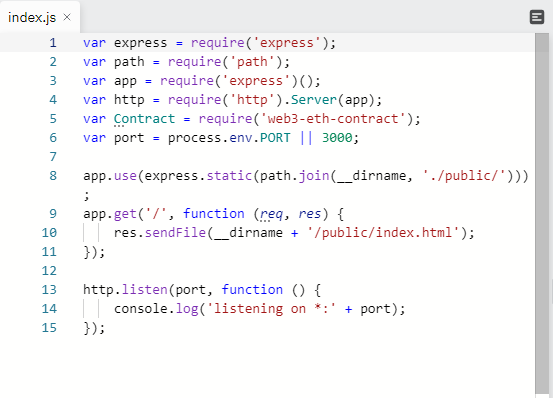
Afterwards, we’ll set up our index.js file to be able to run our app.
To run the application, run the following command in the shell than press run:
node index.js
You can also run it on a new tab with the link at the top right:

Step #6: Import everything you need
You need to import a few things for your html file:
- Web3.js script
- contract.js file
- Bootstrap (optional for style)
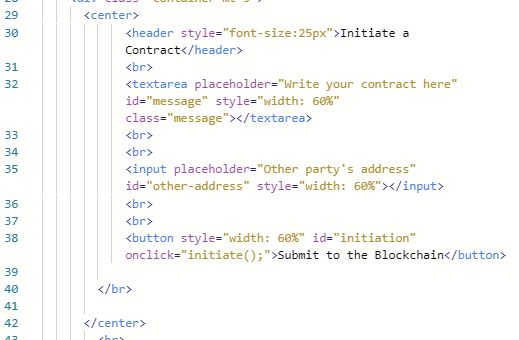
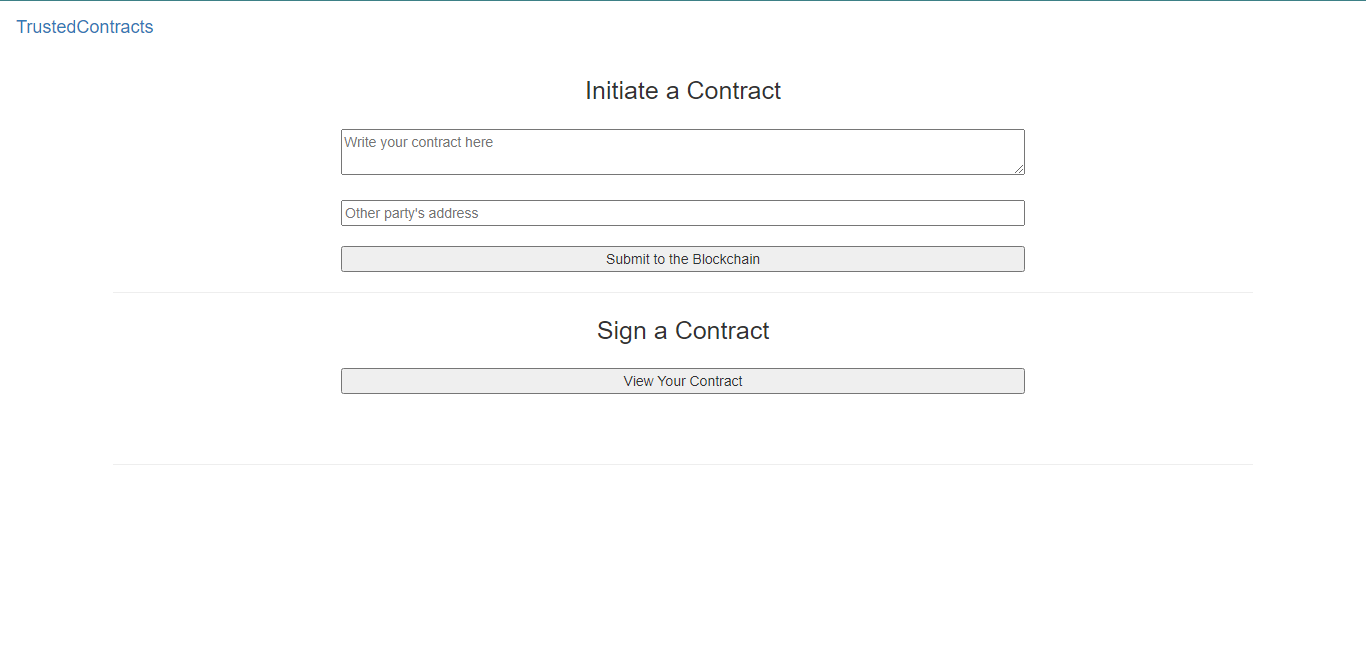
Step #7: Create a form to initiate the contract
To allow users to initiate a contract, you would need to use a form with a field for the contract and a field for the recipient’s address, as well as a “submit” button.
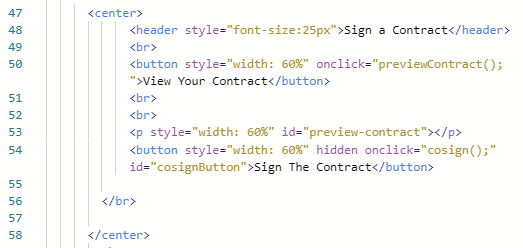
Step #8: Create form to sign a contract
Next thing is a form to view and sign a contract. For this, we need a button to view the contract, then we should have text returned from the smart contract if there is a contract for the recipient and a button to sign it.
So the way we’re going to do that is by creating a normal button that a user would click to view the contract, then we will add in an empty paragraph element with an id — that would be where we would put the contract content, and finally we need a button that only shows once the contract is returned, so we can do that by using the hidden attribute and manipulate it later on in the script.
Step #9: Connect Metamask function
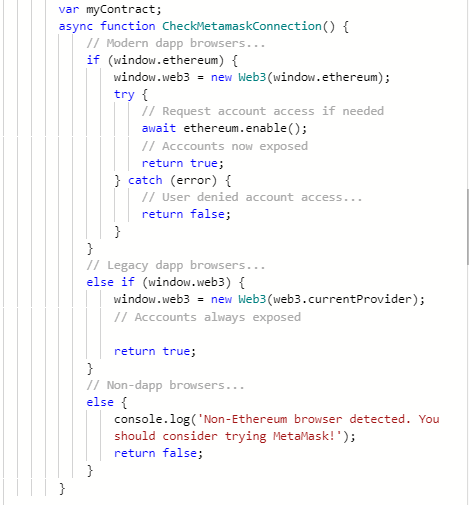
We can use some web3.js functions under the document.ready function to be able to connect a user’s Metamask address to the application.
Step #9: Create a function to get the current account
I will need the current account for some of the functions to work, so I created a locally-defined function to get the current account.
With new updates, there might be a built-in function to do that but I went with a locally defined one.

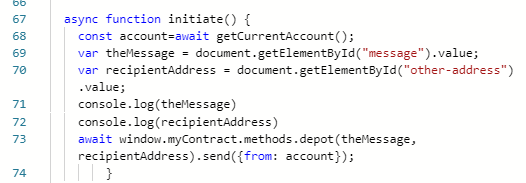
Step #9: Create a function to Initiate a contract
Now we can create a js function to initiate a contract. We need to use some getElementById statements to get inputs from the form, as well as a window.myContract.methods statement to send inputs to the Blockchain.
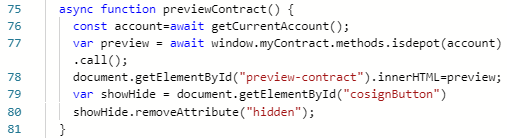
Step #9: Create a function to Preview a contract
Next we need a function to be able to preview a contract for a recipient. Again, we would need to use a window.myContract.methods to call the contract text, as well as a getElementById statement to show the button we hid earlier.
Step #10: Create a Function to Sign a Contract
Final step of code here, almost there!
We just need to create a function that signs the contract when the button is clicked and gas fees confirmed with a simple window.myContract.methods statement.

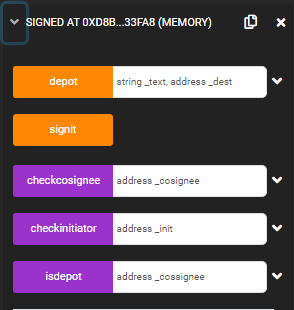
Step #11: Test your D-App
At this point, the app should be up and running. You can test it with secondary accounts in your computer, and you can also share the repl link with friends and family to try out!
轉貼自Source: blog.innostation.org
若喜歡本文,請關注我們的臉書 Please Like our Facebook Page: Big Data In Finance
留下你的回應
以訪客張貼回應